

How To Make Animated Background For Twitch
Tech
How to make animated Twitch overlays: A step by step tutorial
Here'due south everything you demand to know.
Building your ain animated stream overlay is an awesome way to create designs that really reflect your brand and personality. If you cannot afford to get custom-fabricated overlays and then designing your ain is a groovy culling. Creating a streaming overlay is well-nigh complimentary if you take access to the necessary software.
This tutorial assumes you lot know the basics of the pattern tools, on the specific creation process needed to make blithe Twitch overlays. We will go through all of the essential overlay blueprint elements and give tips on designing each one and the purpose they serve.
With so many dissimilar styles and means of creating overlays, it's best we give you the framework for building 1 rather than a tutorial on creating one specific mode.
Creating The Base Pattern
When learning how to brand animated Twitch overlays, the best identify to start is in your graphic pattern software. For this tutorial nosotros will be referencing Photoshop equally it is the most popular choice out in that location. If you do not have access to Photoshop so a great free alternative is Gimp.
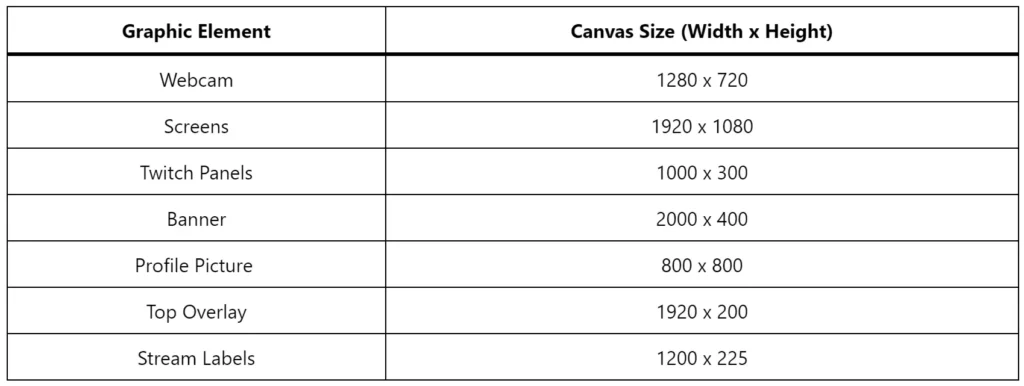
Every design starts with a blank sail, and it is important to set the correct canvas size before getting started. See below for details on the all-time sizes for each graphical elements.
Overlay Canvas Sizes
To create a canvas of your required size in Photoshop get to File -> New. You lot should now get a popular-upward like shown below.
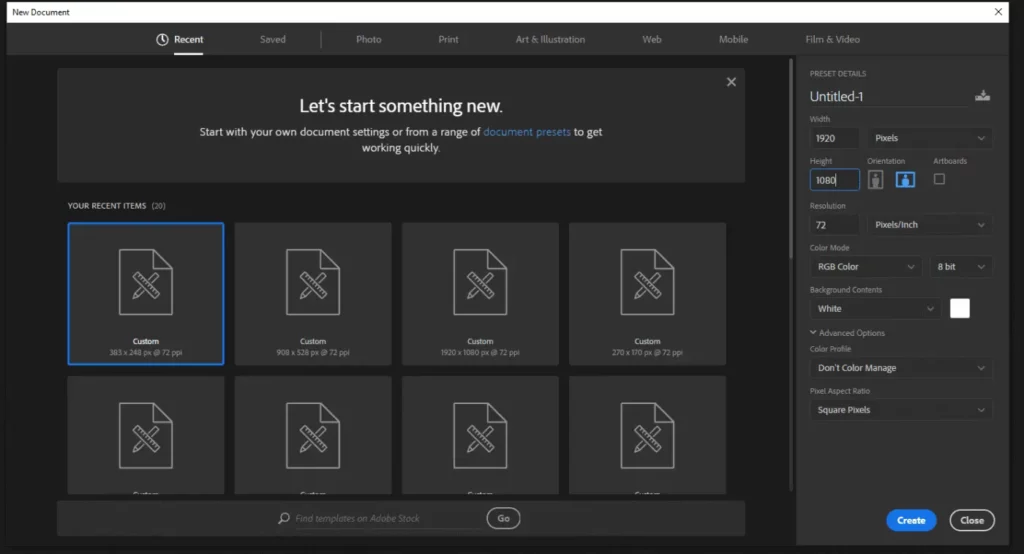
On the right-paw side of this pop-upwards, you will run across options to input values such equally width and height. Input your values here and click create. You lot now have a blank canvas fix to make some awesome designs.
To kickoff creating the actual design we highly recommend checking out YouTube tutorials for the specific element and style you are trying to create. Visual learning is a much more constructive fashion of understanding the techniques that are used for each mode. The tools you employ to design one overlay might be completely different in another depending on the manner.
Animating The Design
Now that you have your base design, it's time to kickoff animative. Later on Effects is by far the most pop software solution for creating animations, however, it'due south a premium programme. For those with little money to spend, a great alternative is DaVinci Resolve. This software has a gratuitous version bachelor.
Photoshop files tin can be imported straight into an Subsequently Effects projection. When creating a composition make sure that the resolution matches that of the Photoshop file. This is to make certain yous have the correct resolution when exporting after on.
As with the base pattern, it'due south all-time to refer to YouTube for tutorials on how to breathing the designs to go your desired fashion. The most common animation elements for overlays are particle effects and glow using the saber plugin.
Looping A Design
For blithe graphics similar a webcam, or suspension screen, it's important to brand sure that the animations loop perfectly. This ways that if you played the blitheness on echo, there are no sudden jumps when the animation ends and starts playing again.
In nearly cases this is just a case of making sure the animated elements are in the same position on the last frame as the kickoff frame. With that being said, particle furnishings tin can be catchy to loop. This is due to the fact that particle effects are randomly generated.
The most constructive way to make them loop in this instance is to have the particles fade out near the cease of the animation and fade in at the beginning.
Once you take the animation looping nicely it'due south time to export them.
Exporting Animations
The final step is to export your blitheness to a file format suitable for your streaming software. For best performance we recommend using WebM file format. This file format holds transparency which is very important for elements such as the webcam that comprise "run across-through" parts.
The beginning step is to consign the blitheness from After Furnishings to a MOV file. Select the composition you wish to export then go File -> Export -> Add To Return Queue
Now Select the Output module in the return queue to bring up the pop-upwards like below.
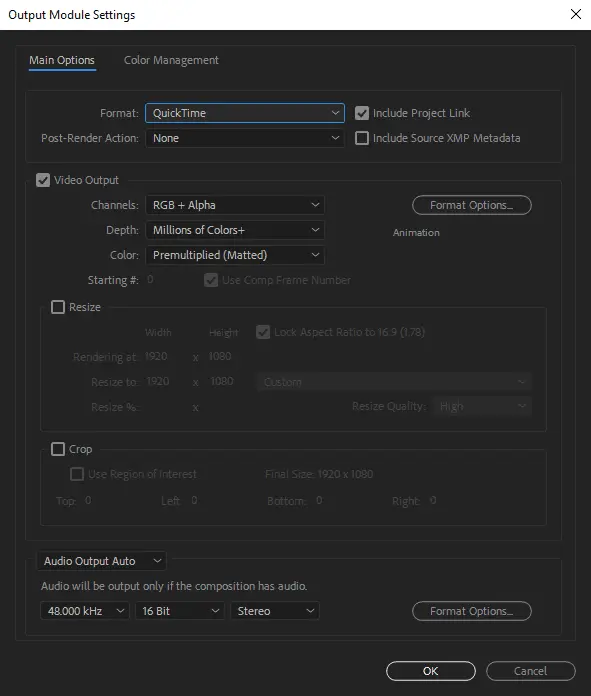
The format should exist set to QuickTime. Brand certain to select "RGB + Blastoff" from the channels dropdown. This will make sure that the file volition retain its transparency.
Once y'all take rendered this file information technology should be in the MOV file format. This file now needs to be put into some other program called Premiere Pro to export as a WebM. You will also need a plugin chosen "WebM for Premiere", created by fnord.
Open up upwards premiere and elevate your MOV file into the projection timeline. Now select it and get File -> Export -> Media. This will bring upward the consign settings.
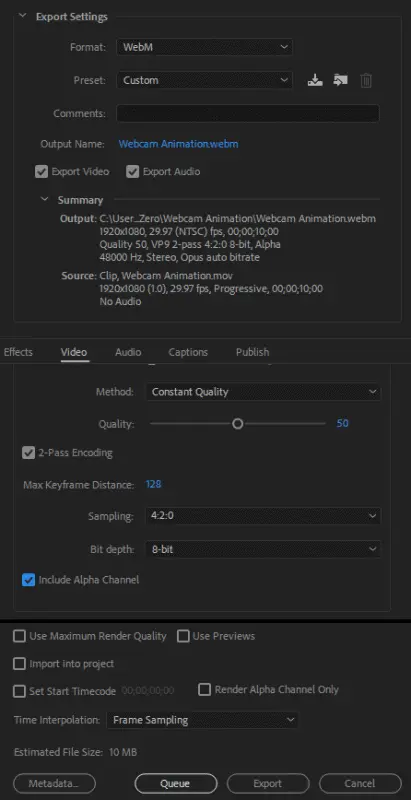
Make sure to select WebM from the formats dropdown. Similarly, bank check the "Include Alpha Aqueduct". This step is important as it ensures that the final output retains transparency.
Conclusion
Now that you lot take your exported blitheness files, all that is left to do is ready them upward within your streaming software. At that place is a surprising amount of piece of work involved in creating overlays and requires a lot of practise to get the hang of the design software.
All the same, if y'all are working with a budget, then learning how to brand blithe Twitch overlays from scratch might just be your best option.
Accept any thoughts on this? Let us know down beneath in the comments or conduct the discussion over to our Twitter or Facebook.
Editors' Recommendations:
![]()
Source: https://knowtechie.com/how-to-make-animated-twitch-overlays-a-step-by-step-tutorial/
Posted by: baileythessalky.blogspot.com
0 Response to "How To Make Animated Background For Twitch"
Post a Comment